

Practical Panoramic Imaging
Course Number: 589
Course Contents
Patient Positioning and Instructions
Step into the machine. Instruct the patient to stand behind the machine with a straight, erect spine with the shoulders down. The clinician should adjust the machine just slightly higher than the patient’s chin. Instruct the patient to step forward, placing their hands low on the hand holds preferably to keep the shoulders down. Make sure that the machine will clear the shoulders bilaterally.
Have the patient shuffle forward. Because of the design of the panoramic unit, the natural tendency for patients when asked to put their head in the head holder is to thrust or duck it forward, slumping over. This slumped position produces a greater depth of soft tissue of the neck with an increase in midline opacity on the resultant image.
Bite in the bite block. While this direction may seem simple, most patients will require some guidance as to what to do. Raise the bite block so that the patient can get their anterior teeth in the groove end-to-end, then lower the pin so the chin is seated on the chin rest. The overriding principle is that the incisal edges of the anterior teeth must be stabilized within the grooves. The grooves in the bite block coincide with the middle plane of the anterior portion of the focal trough which is the mechanism by which the anteroposterior position of the head is is established. If the patient is edentulous, place a cotton roll on each side of the bite block and secure with an orthodontic elastic or rubber band. The elastic can be placed to coincide with the bite block groove so that the patient can detect where to place their ridges.
Adjust head position horizontally. Correct positioning with respect to the horizontal plane minimizes differential left or right distortion and can be accomplished by visual assessment of the tilt and rotation of the patient’s head from behind. In most panoramic units, this is further facilitated with the use of a midsagittal reference light or line superimposed on the frontal head support to assist the clinician with horizontal head positioning. The temple bars should be put in place to help maintain the head position. The midsagittal or horizontal head plane is best evaluated by looking down the light directly at the patient’s midline. If the machine utilizes a mirror system, ask the patient to align their head by looking at their reflection in the mirror and adjusting the position of their head so that the line equally divides their face right to left.
Adjust head vertically. Typically, the Frankfort horizontal plane or the occlusal plane is used to set the vertical (up/down) head plane in panoramic imaging. Refer to the manufacturer’s instructions for the specific reference line for the panoramic unit being used.
While the teeth are engaged in the bite block end-to-end, the panoramic unit should be raised or lowered such that the lateral reference line referred to in the manufacturer’s instructions is parallel to an external reference plane. This external reference plane can be the floor or is located on the head holding device. Many panoramic units use adjustable light beams to assist the operator in orientating the patient’s head. (Figure 18) It is best to evaluate the vertical head plane from the side or by looking at the patient’s profile. The forehead and chin should be in the same vertical plane. Many units will also have a forehead support to secure the patient’s head position in the vertical plane. (Figure 18 and 19)
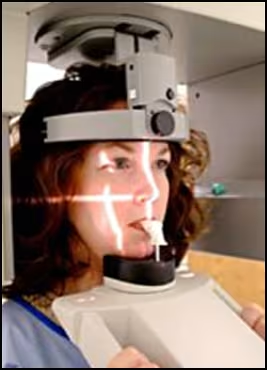
Figure 24.Panoramic unit (PC1000, Panoramic Corp.) with external reference guides on lateral head holders.

Figure 25. Panoramic unit (OP100, Instrumentarium Imaging) with light beam reference guides projected onto the patient’s face.
Adjust head position anteroposteriorly. The anteroposterior (AP) plane is aligned with a specific landmark that varies among panoramic machines. It is important to know the specific landmark recommended by the manufacturer. The AP position is aligned by moving the chin rest forward or back until it is aligned with the landmark. Many machines align the AP between the maxillary lateral incisor and canine contact or centered over the maxillary canine tooth. If the patient is missing anterior teeth, the AP light can be aligned with the ala or corner of the nose. The AP position is best evaluated by looking down the light from the corner of the arch. Some panoramic machines automatically adjust the AP position for the operator.
Ask the patient to close lips and press the tongue on the roof of their mouth. During the previous stages, the patient’s facial musculature will tend to assume a relaxed position. This results in the lips around the bite block being open and the tongue dropping to the floor of the mouth. Immediately prior to exposure the patient should be instructed to close their lips, swallow, and press their entire tongue against the roof of their mouth and keep it there throughout the exposure.

Figure 20. Final Head Position
According to Rushton et al., while failure of the patient to place their tongue in the correct position is the most common technical fault (71.9%), it rarely results in an image being unacceptable (0.1%).21 Several more recent studies have documented that the tongue placement error continues to persist as the most common whether digital or film-based systems are utilized.22-24
Alternate Pre-exposure Instructions Alternate pre-exposure instructions can be employed to help reduce the tongue placement error. This method developed by Scott and Reed is based on the simple breathing technique (SBT) which utilizes the known position of the tongue during respiration.25 The SBT avoids any mention of the tongue which often is confusing to patients.25 Prior to entering the machine, the clinician can demonstrate the technique and invite the patient to join them in practice. The steps include: 1) breathe-in through the nose, 2) breathe-out through the mouth, 3) swallow with your lips closed and 4) hold still.25 Once the patient is positioned in the machine and the head is properly aligned, the patient is reminded to repeat the steps when they hear the clinician give the instructions.25 The authors suggest that the final instructions be given slowly five second after the exposure switch is engaged.25 The exact timing may require adjustment depending on the specific panoramic machine used.25 The SBT has proven to be effective in airspace error reduction, particularly in children and special care patients.25